
My beautiful friend Julia always has a perfect manicure. I was admiring her nails one day and she told me they were no-chip. I went out that week and got myself a fancy no-chip and that was the beginning of my obsession and my $55-60 a month addiction. I was going about every three weeks to get my nails done. My nails grow pretty quick and by the third week the outgrowth was obvious. I would have gone more often, but my budget was already screaming at me to go easy.
Then, my sister Sharleen told me she was going to go with no-chip but was thinking about doing them herself. I quickly told her, oh no… don’t do that. It’s not like a regular manicure and if you don’t know what you’re doing you’ll mess it up. I had been watching the nail technicians for over a year and I started listing the techniques and tricks they used. The brands that worked well and the brand that was rough on my nails. I realized, I learned a thing or two sitting in that chair watching them and I could actually do this myself. So I did.
I bought the supplies I needed on Amazon for around $100 and gave it a try. My first attempt wasn’t bad at all, not perfect, but I knew I’d only get better. I’ve been doing my no-chips now for over three months and they look just as good as the salon. The best part is that what I saved in doing them myself, has already covered the expense of the supplies. Every so often, I splurge and buy a few new colors but I am financially so far ahead. Cha-ching!
Like a good friend, I let Julia know that I’m now doing no-chips myself and sent her links to the products I bought. She did the same and is now saving too.
My sister Sharleen went to the salon a few times and watched how they applied the no-chip. She then purchased the supplies she needed and now doing her no-chips at home.
And they’ll tell their friends, and they’ll tell their friends, and so on, and so on…
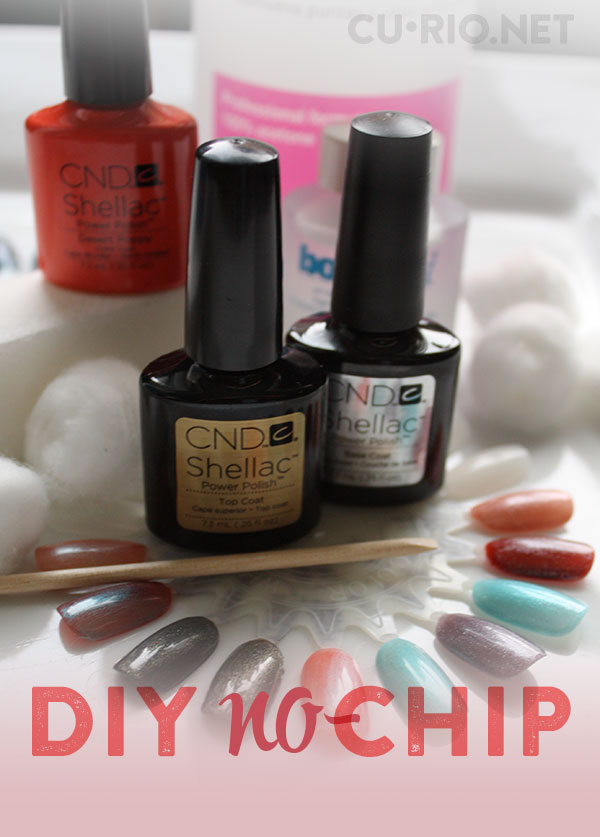
(left to right) Me: CND Hot Chilis. Sharleen: Gelish Sea Foam. Julia: CND Hot Tropix.
How to:

1. Remove any old polish and prep your nails as you would for any manicure. If you’re removing a no-chip, do not peal it off. I made that mistake and it took a little bit of my actual nails with it and left them weak. Soak your your nails in acetone and the shellac will bubble up and you’ll be able to gently scrape it away. I use a technique I saw one of the nail technicians do, soak a cotton ball in acetone and lay it on your nail bed, then wrap the tip of your finger in aluminum foil to keep the acetone from dripping all over. Wait about five minutes, the shellac should be bubbled up. If not, gently scrape, wrap back up and wait a couple more minutes.
2. Using a nail buffer, roughen up the beds of your nails slightly. Be gentle, roughening just enough to help the shellac bond better.
3. Wash your nails well and then brush them with OPI Bond-Aid.

4. Apply a base coat, two coats of color and then your top coat. Cure for two minutes between each coat and then cure an additional three minutes at the end (don’t touch your nails between coats, they will be tacky). There are many brands out there and everyone has an opinion on what is best. I prefer CND. I’ve had OPI and it was harsh on my nails and took a long time to remove. I’ve heard good things about Gelish, that it’s not harsh on your nails and it’s easy to remove too. My sister is using it with success. Tip: don’t have any shellac on your skin when you cure it. Unlike regular polish which will just rub off the skin, shellac will peal up. Your edges won’t be adhered to the nail and peal away quicker. Stop your color just before you get to the cuticle. If you accidentally get some on your skin, use an orange wood stick to remove it.
5. When your nails are cured, whip off the tacky layer with some rubbing alcohol on a paper towel. Finish off with a little cuticle conditioner.
There it is, no-chip and you saved yourself some cash!
Supplies:

- 54 WATT ROYAL NAILS UV LIGT: I went big! At only $49.99, it’s a great deal. I like that I can cure both hands at once and it’s big enough to do a pedicure. I set it for two minutes after each coat and then at the end I cure an additional three minutes.
- OPI Bond-Aid: This isn’t necessary, but I do notice a difference when I use it. One time I forgot to prep my right hand with this and sure enough, at the end of two weeks the color on the right hand was peeling off. My manicures last longer with it for sure!
- CND Shellac Top and Base Coat: CND, my favorite!! It lasts, is easy to remove and isn’t harsh on my nails.
- CND Nail Shellac, Midnight Swim: If I had to choose one color it would be this, Midnight Swim. I don’t usually where blue, but this one is dark and sophisticated. It goes with everything, dress it up or blue jeans. Love it!
- To remove your old no-chip manicure you’ll need: pure acetone, aluminum foil, cotton balls and orange wood sticks.
- To prep your nails for your no-chip, you’ll need: cuticle remover, cuticle trimmer and pusher and a nail buffer.
- And finally, to finish off your manicure you’ll need: isopropyl rubbing alcohol and some nail and cuticle conditioner.
Items in #5-6 you probably will have on hand already. If not, they are easy to get at your local drug store or at Sally’s Beauty Supply.
The only downside to ordering your colors online is you can’t really tell what you’re getting. I’ve been disappointed a couple times. Julia mentioned maybe painting some plastic and sharing our colors with each other. Then yesterday I was walking the isles of Sally’s Beauty Supply and spotted some nail polish wheels. Perfect! I painted two, one for my own reference and one to share with her. I wrote the color names on the back with a Sharpie. Then I started thinking about how you can layer CND to get even more colors. I did a few tests and found some combinations I like. The colors I didn’t like, I now do when they are layered!
You can download pdf shellac layering sheets from CND’s website (scroll down, the pdf links are on the right). If you want even more ideas, check out LiverpoolLashes’ Ultimate Shellac Layering Video with Swatches. The possibilities are endless!

Have you tried DIY no-chip? I’d love to hear how it went and if you have any tips to share.
